
GPT Image 2.5 Flare is the fast, default model in OpenAI’s GPT Image 2.5 family, and it gives you five quality tiers: low, medium, high, xhigh and max. At the time of testing, those tiers cost from 1 to 25 credits per image on our site, depending on resolution and quality, so which one you pick matters. Instead of only listing the settings, we ran 17 generations through GPT Image 2.5 Flare on photos, text posters and image edits, and recorded the output, the wait and the credit cost. This guide covers what changes between tiers, what doesn’t, and which GPT Image 2.5 Flare quality setting fits which job.
Quick answer: Start at 1K medium. Move up only when you can name a specific flaw a higher tier might fix. If two tiers make the same mistake, rewrite the prompt instead of spending more credits.
The Best GPT Image 2.5 Flare Quality Setting by Use Case
These picks are based on our tests below and on the site’s credit table.
What you’re making | Recommended tier | Why |
|---|---|---|
Prompt drafts and composition checks | Medium | At the same 1-credit price, medium retained the steam that low omitted in our café test |
Social posts, blog images, thumbnails | Medium | Medium met the brief; high added richer detail but also an unrequested element |
Text-only posters and simple layouts | Medium | Text was already correct in our medium runs |
Infographics with meaningful illustrations | Compare Medium and High | High improved icon logic in our dense infographic example |
Product-style images and hero visuals | Compare High and Xhigh | In our single photo test, xhigh produced the clearest material texture, but more runs are needed before treating that as a consistent advantage |
Lifestyle and showcase renders | Max (sparingly) | Most atmosphere, but it added the most unrequested props, so it’s a poor fit for tightly controlled briefs |
Image edits | Medium first | Both tiers repeated the miss; rewriting the prompt is the next step |
In short, medium is the smart default, and high is the first tier to compare when medium has a visible shortfall. Xhigh and max are worth testing for final images, not using by default.
How We Tested GPT Image 2.5 Flare
All tests ran on September 23, 2026 in our own generator, with 1K resolution and PNG output. We changed only the quality tier within each comparison and ran five tests (17 generations in total):
Test 1, photo realism: one café prompt at all five tiers, 16:9 (5 images)
Test 2, dense text: a roughly 35-word infographic at low and high, 16:9 (2 images)
Test 3, social composition: one square campaign image at medium and high, 1:1 (2 images)
Test 4, short text: a simple poster, two runs each at medium and high, 1:1 (4 images)
Test 5, image editing: a background swap, two runs each at medium and high, 1:1 (4 images)
We checked instruction following, text accuracy, unrequested additions, how well the reference was preserved, the credit cost shown before generating, and the time from clicking Generate to seeing the result in the browser. These are real sessions, not lab benchmarks. With one to two runs per setting, treat the results as a practical guide rather than a universal ranking.
GPT Image 2.5 Flare Quality Settings Explained
Quality Is Not Resolution
In our tests, every quality tier produced the same pixel size: 1360 × 768 for 16:9 at 1K. Going from low to max didn’t add a single pixel. Resolution (1K, 2K or 4K) sets the canvas size. Quality sets how much rendering effort the model spends inside that canvas, which mainly affects detail but, as our tests show, can also change composition and styling.
If you need a bigger file for print or a banner, change the resolution. If you need richer textures, cleaner edges or more coherent small elements, change the quality.
The Five Tiers at a Glance
OpenAI’s Flare model documentation lists low, medium, high, xhigh and max (plus auto). Here is how they mapped to credits on our site when we tested them on September 23, 2026:
Quality tier | 1K | 2K | 4K |
|---|---|---|---|
Low | 1 | 1 | 2 |
Medium | 1 | 2 | 3 |
High | 3 | 4 | 7 |
Xhigh | 5 | 7 | 12 |
Max | 9 | 15 | 25 |
Costs are Flare credits per image. The full breakdown, including Sunburst, is on our pricing page. Note that at 1K, low and medium cost the same single credit.
OpenAI’s own image prompting guide makes a related point: a higher setting doesn’t guarantee a better result for every prompt, and xhigh or max should be used only when they fix an unmet quality requirement. Our results were consistent with that.
Test 1: One Photo Prompt Across All Five Flare Quality Tiers
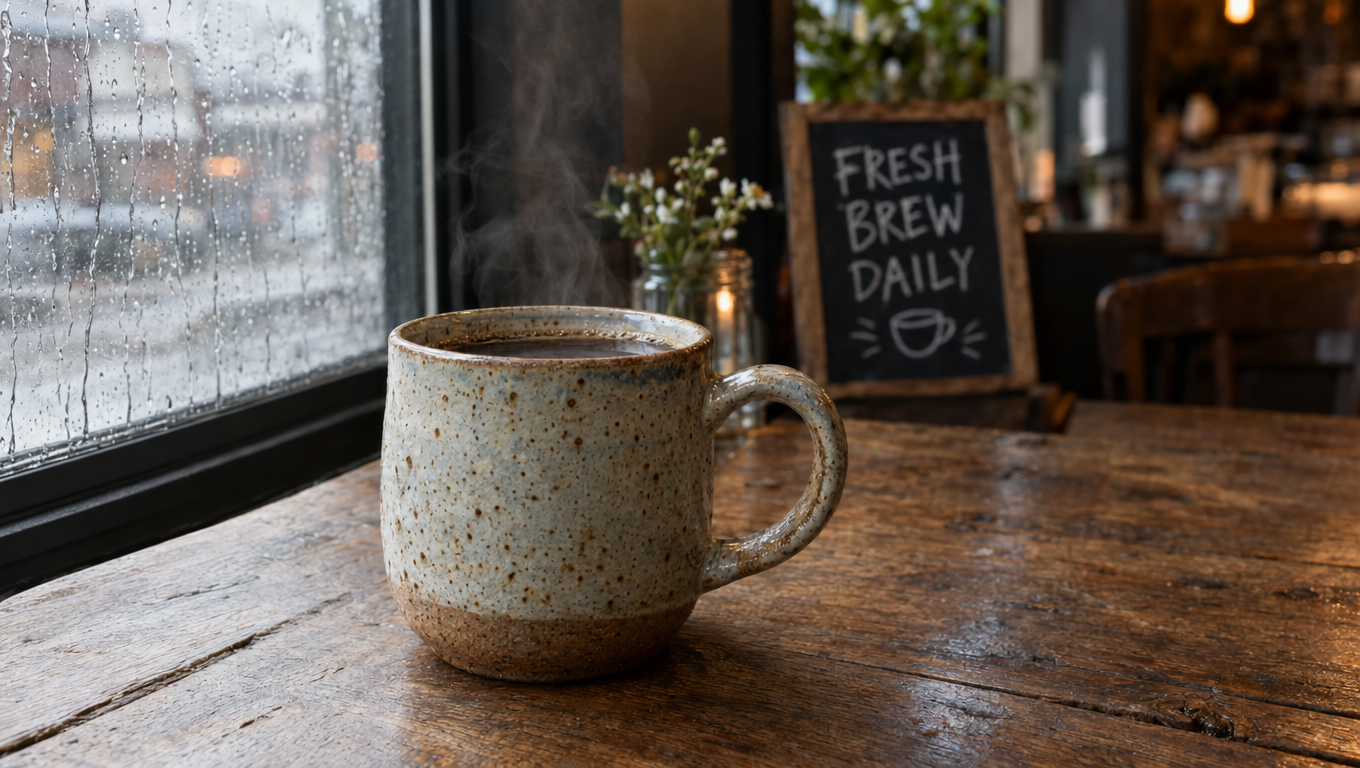
Prompt: A handmade ceramic coffee mug on a weathered oak café table beside a rain-streaked window, soft morning light, visible steam, speckled glaze texture, a small chalkboard sign in the background that reads “FRESH BREW DAILY”, shallow depth of field, photorealistic.
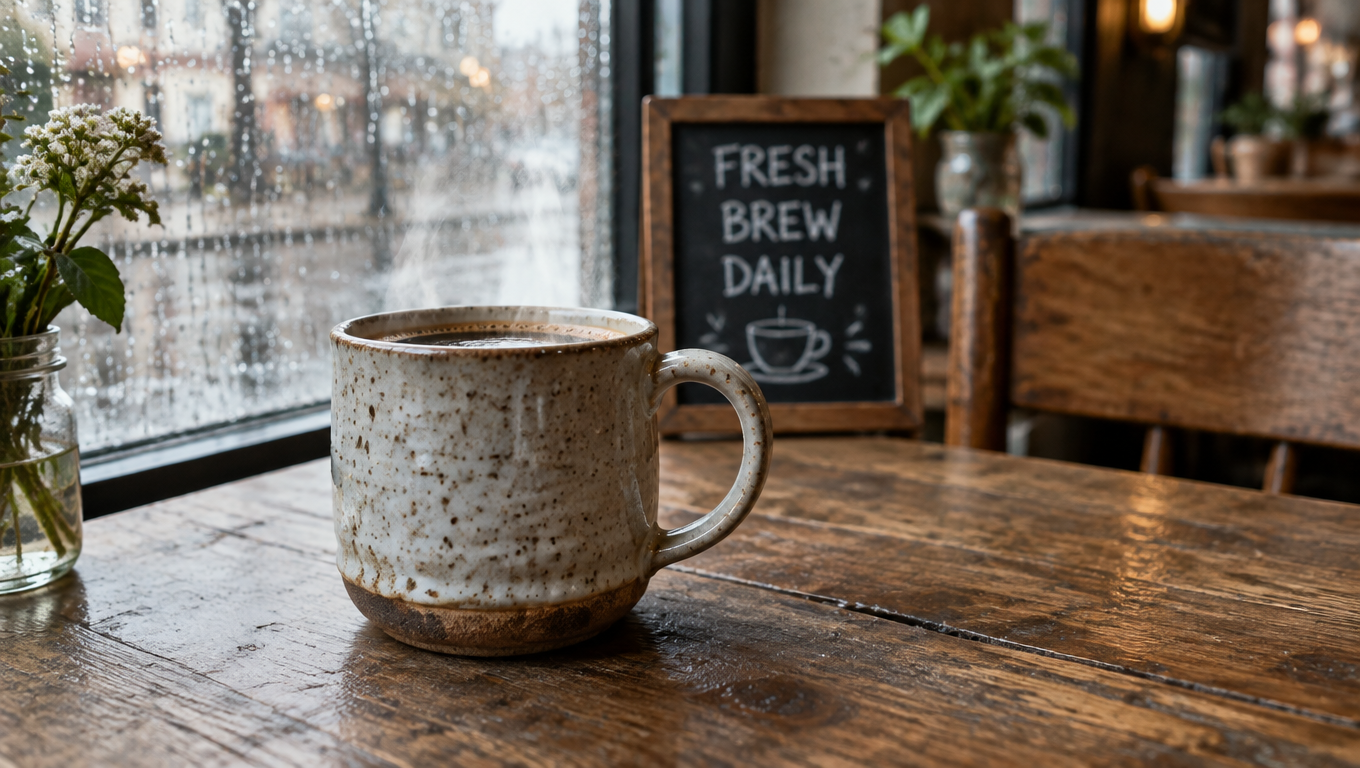
Low Quality (1 credit)
GPT Image 2.5 Flare on low quality was better than we expected. The sign read “FRESH BREW DAILY” correctly, the rain looked convincing and the glaze was speckled. But the model dropped the steam, which the prompt asked for explicitly, and the lighting was flatter. It’s usable for drafts, but at 1K it costs the same as medium.
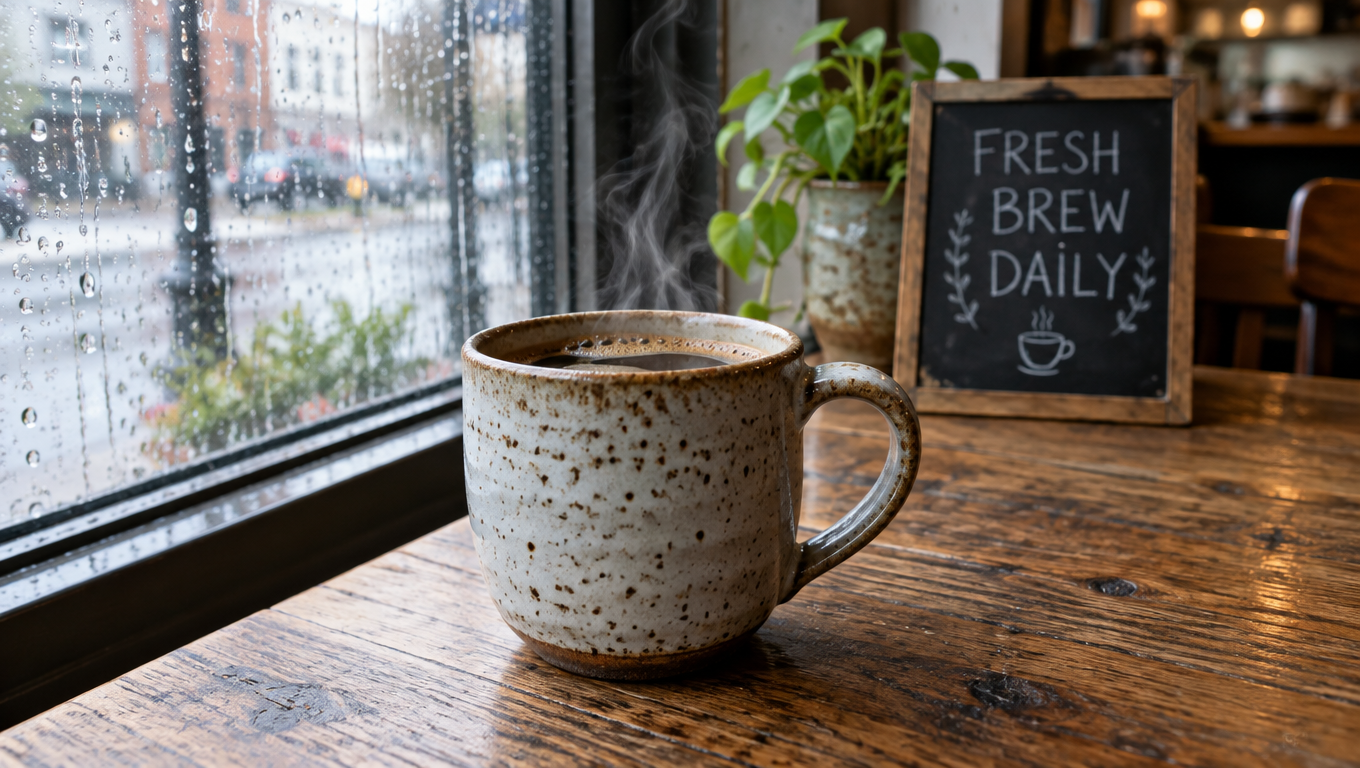
Medium Quality (1 credit)
Medium delivered every element: steam, rain, speckled glaze, a correctly spelled sign and a pleasant shallow depth of field. This is the tier we’d use for most everyday prompting.
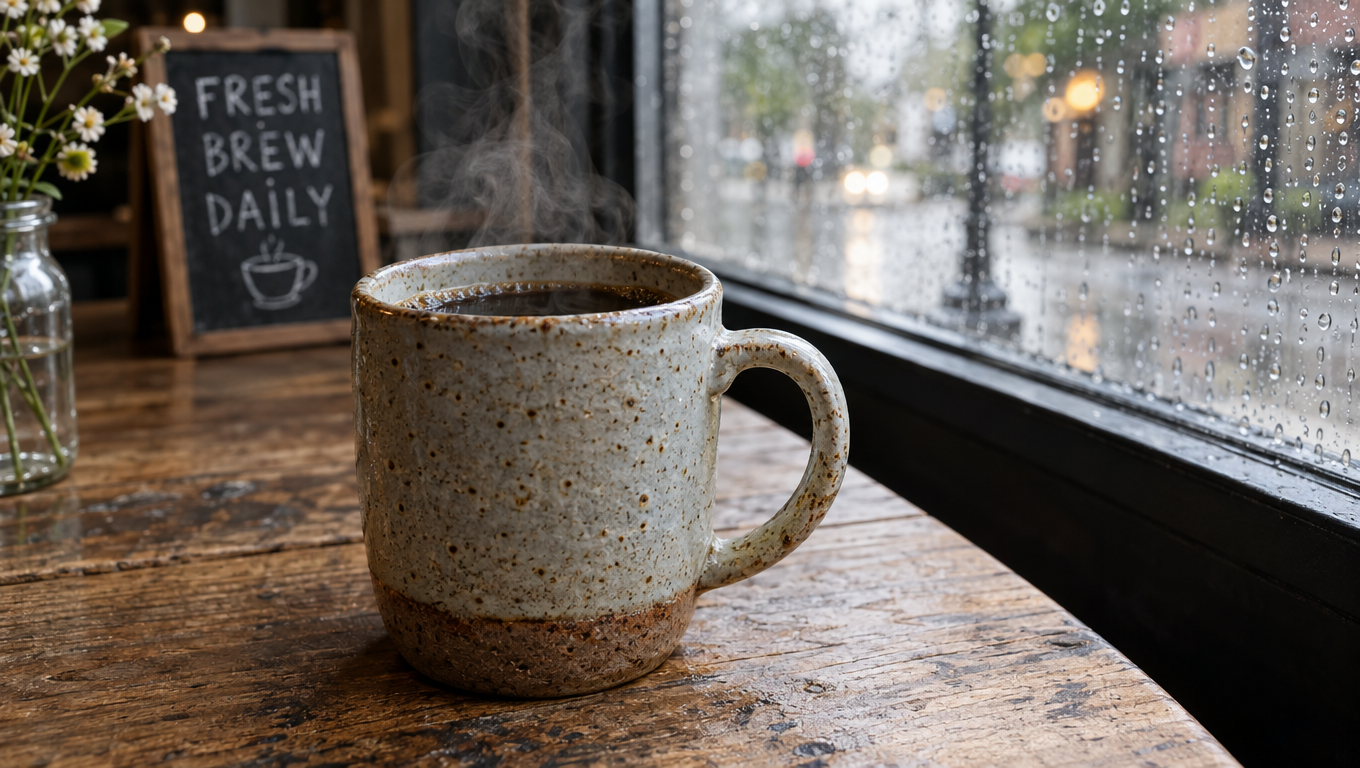
High Quality (3 credits)
High looked much like medium at normal viewing size, with slightly crisper speckles and cleaner reflections on the wet glass. The difference is real but modest, and you’ll notice it more on a large screen than in a social feed.
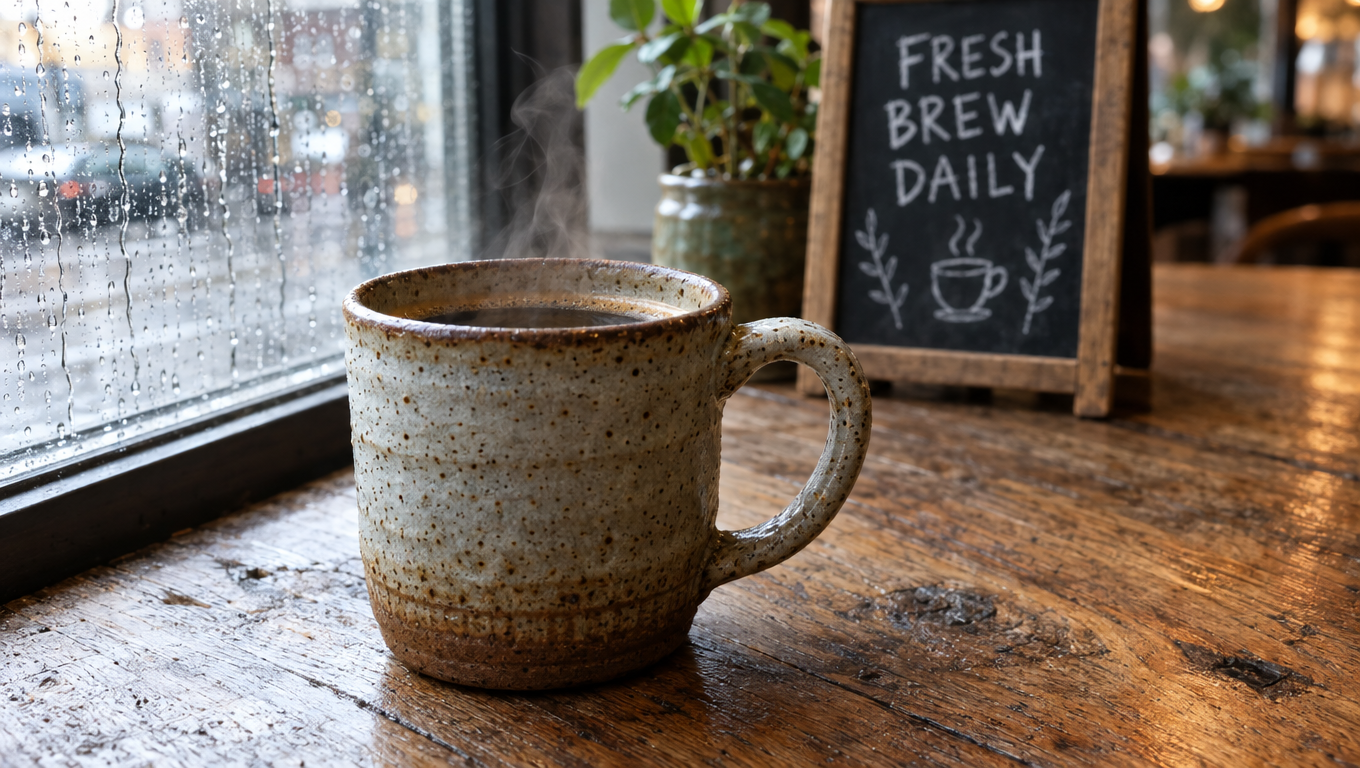
Xhigh Quality (5 credits)
This is where GPT Image 2.5 Flare changed character. The mug filled more of the frame, the glaze showed layered speckling and throwing lines, the wood gained knots and wear marks, and the window light added real depth. The chalk lettering looked hand-drawn. It was the closest of the five to a commercial product shot, but this is one image from one prompt, so compare high and xhigh on your own subject before committing.
Max Quality (9 credits)
Max produced the most atmospheric result, with deeper bokeh and soft rising steam. Every tier added some café decor the prompt didn’t mention, such as a potted plant or a jar of flowers, but max went furthest, adding both flowers and a lit candle. That extra styling may help a lifestyle image, while making max less suitable for a tightly controlled brief. The mug texture wasn’t clearly better than on xhigh, and max costs 80% more credits (9 vs 5).
Tier | Credits (1K) | All requested elements | Unrequested props | Detail level |
|---|---|---|---|---|
Low | 1 | No (steam missing) | Jar of flowers | Good |
Medium | 1 | Yes | Potted plant | Good |
High | 3 | Yes | Jar of flowers | Good+ |
Xhigh | 5 | Yes | Potted plant | Excellent |
Max | 9 | Yes | Jar of flowers and a candle (the most) | Excellent, most atmospheric |
GPT Image 2.5 Flare spelled the chalkboard sign “FRESH BREW DAILY” correctly at every tier.
Want to see how your own prompt looks at each tier?
Test 2: Dense Text in an Infographic
It’s tempting to reach for a higher setting whenever text is involved, so we tested a roughly 35-word infographic at low and high.
Prompt: A clean flat-design infographic poster titled “HOW TO BREW POUR-OVER COFFEE”. Four numbered steps in a vertical list, each with a small icon and a caption: “1. Grind 20g beans medium-fine”, “2. Rinse filter with hot water”, “3. Bloom with 40ml for 30 seconds”, “4. Pour to 320ml in slow circles”. Footer text: “Total time: 3 minutes 30 seconds”. Cream background, dark brown text, minimal style.
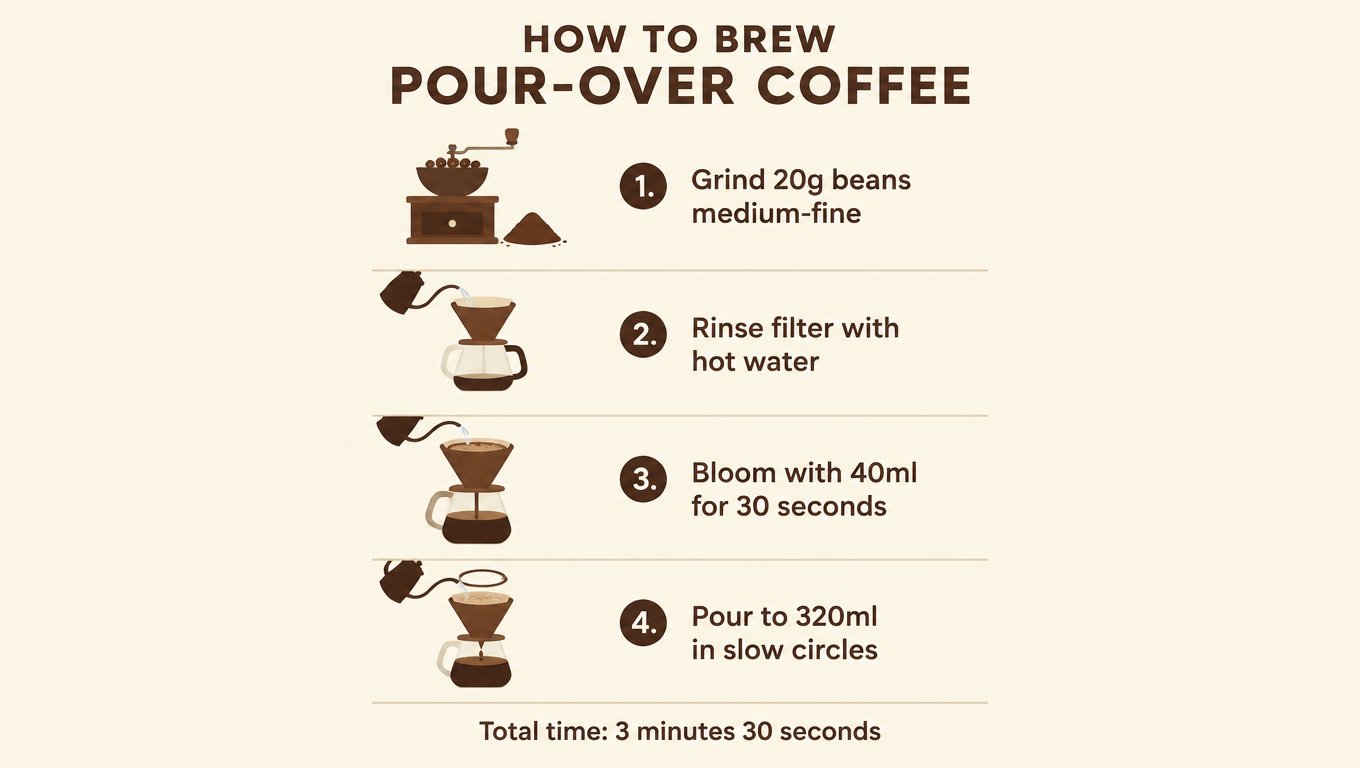
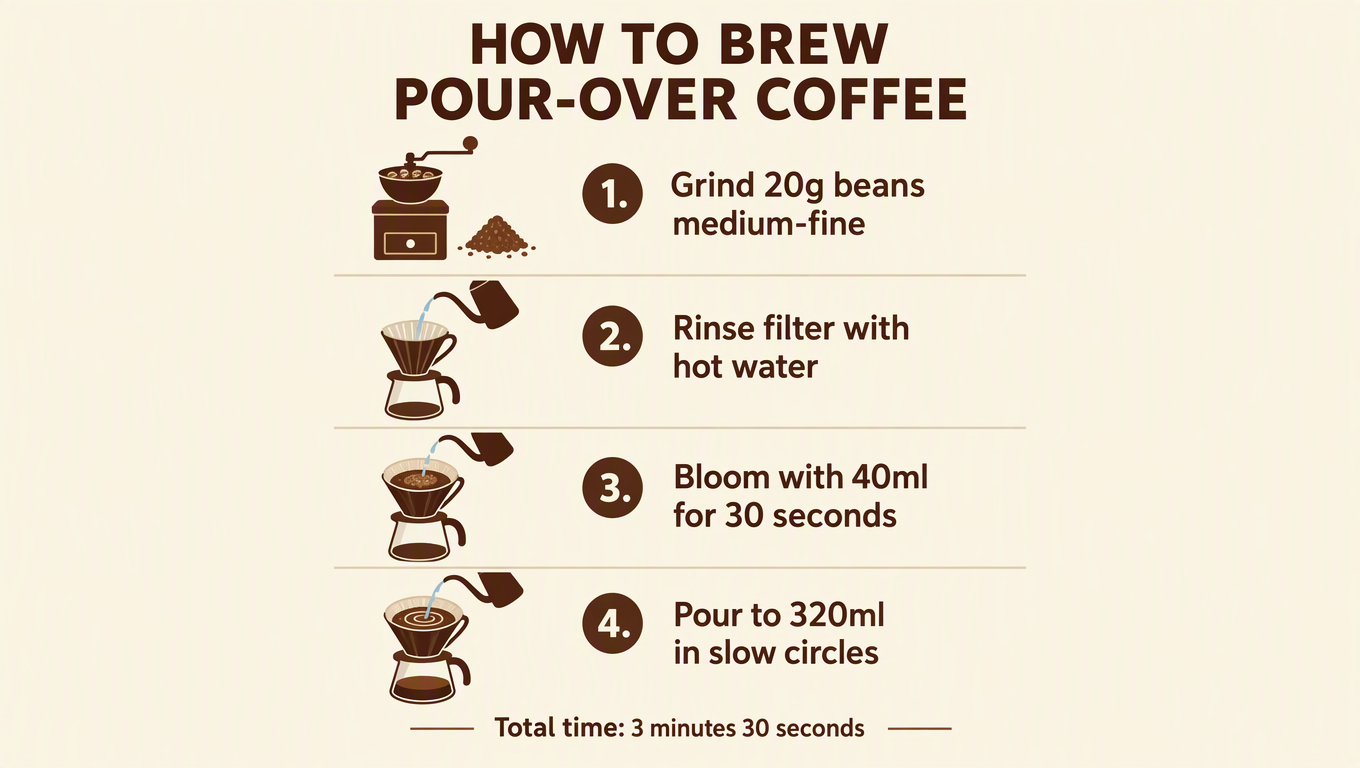
Low (1 credit) | High (3 credits) | |
|---|---|---|
Title, steps and footer | All correct | All correct |
Numbers (20g, 40ml, 320ml, 3:30) | Correct | Correct |
Icons | Kettles float beside the drippers without pouring; stray ring in step 4 | Kettles pour visible water; each icon matches its step |
Visual hierarchy | Lighter title | Bolder title, larger step numbers |
GPT Image 2.5 Flare got every word and number right on both tiers. What high improved was the artwork around the words: on low, the icons looked plausible but didn’t make physical sense.
Test 3: A Social Image With Copy Space
Prompt: Create a square autumn campaign background for a small coffee brand. Show one terracotta ceramic mug on a dark walnut table, positioned in the lower-right area. Add a folded cream linen napkin and two small autumn leaves near the mug. Use soft morning window light and a restrained palette of rust, cream, and brown. Keep the upper-left area simple and open for promotional copy. No lettering, logos, or extra cups.
On medium, GPT Image 2.5 Flare followed the brief closely: one mug in the lower right, open space in the upper left, one napkin, two leaves and no lettering or extra cups. It was usable without another generation.
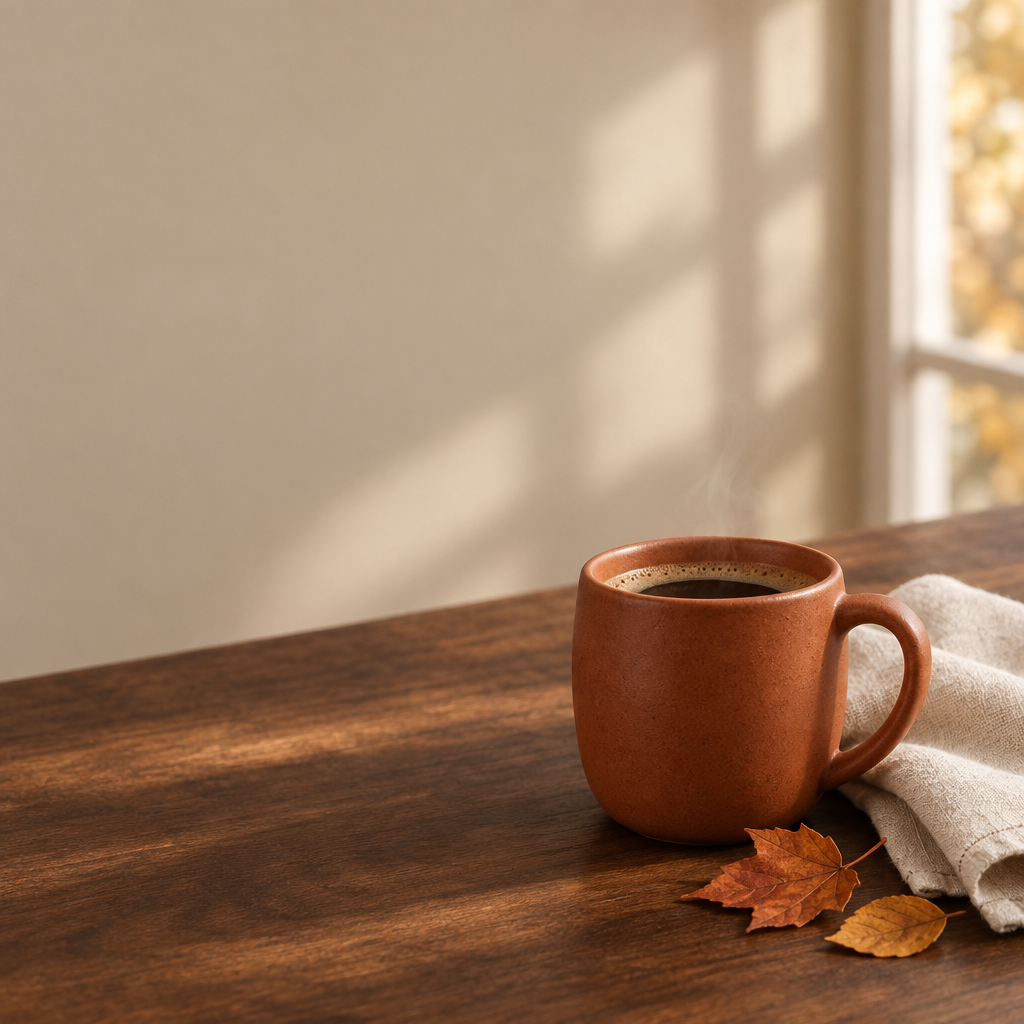
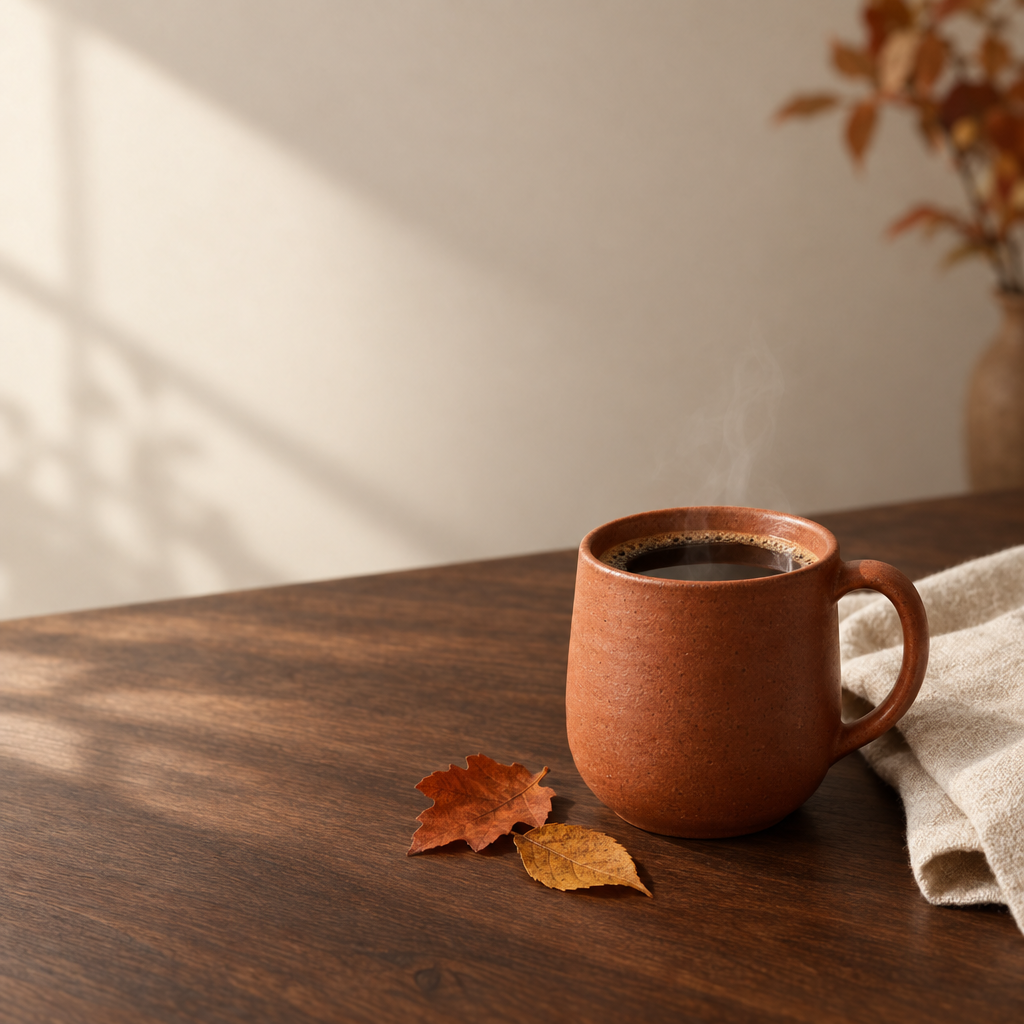
High also met the main requirements and added more visible steam and a slightly richer scene, but it introduced foliage in the upper right that the prompt didn’t ask for. As in Test 1, more rendering effort didn’t mean stricter literal compliance. For a social background that will get typography added later, we’d keep the medium result.
Test 4: Exact Text in a Simple Poster
This square poster for a fictional ceramics workshop asked for the headline “MAKE SOMETHING REAL” and the subtitle “Saturday Ceramics Workshop”, with no other text. All four outputs (two at medium, two at high) spelled both lines correctly and added no dates, logos or extra copy.

Across six text generations in Tests 2 and 4, GPT Image 2.5 Flare got every requested word right, even on low. Our tests used clean layouts and relatively short lines. Very small text, curved labels and dense paragraphs were outside the scope of this test, so proofread every character before publishing.
Test 5: Editing a Background Without Changing the Subject
For the editing test, we took the medium image from Test 3 and asked GPT Image 2.5 Flare to swap the background.
Prompt: Edit the uploaded image. Replace only the wall and window behind the table with a plain muted sage-green studio backdrop. Preserve the exact terracotta mug silhouette, handle shape, rim, coffee level, mug color, mug position, walnut table, cream napkin, and both autumn leaves. Keep the camera angle, framing, and lighting direction unchanged. Do not add objects, text, logos, or steam.
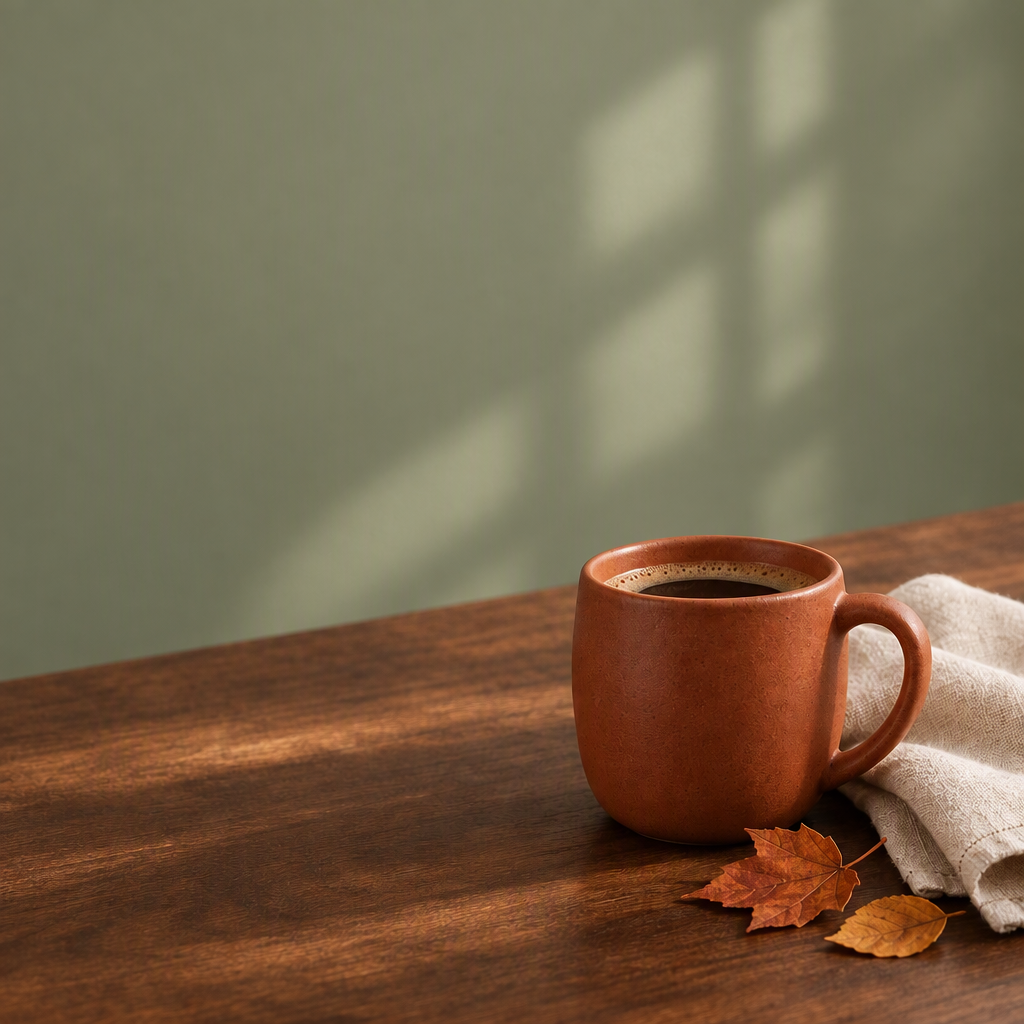
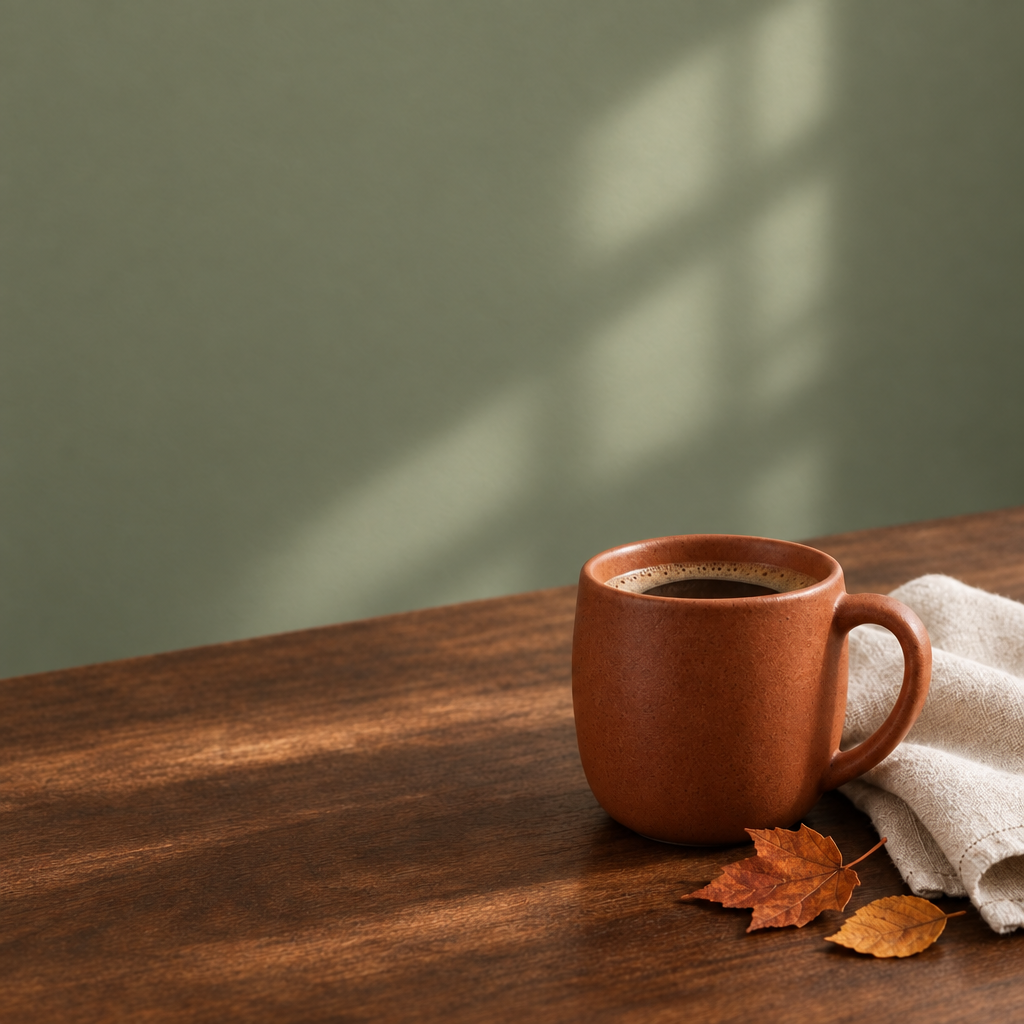
What Flare preserved: in all four runs, the mug, handle, coffee level, table, napkin and both leaves stayed recognizable and in place. No text, logos, extra objects or steam appeared.
What GPT Image 2.5 Flare missed: every output turned the wall sage green and removed the window frame, but every output kept a window-shaped light pattern on the wall, at both medium and high. The prompt asked for a plain backdrop and an unchanged lighting direction, and Flare resolved that conflict the same way every time.
Paying for high didn’t fix it. We didn’t re-run the edit, but removing the ambiguity is the logical next step. A revised prompt would read:
Replace the wall and window with a uniform muted sage-green seamless studio backdrop. Remove the window frame and every window-shaped shadow or light pattern from the background. Preserve the direction and softness of the light on the mug, table, napkin, and leaves. Keep all foreground objects and their positions exactly.
This is one of the most useful lessons from our testing: when medium and high repeat the same mistake, the prompt is the first thing to fix before testing a higher tier again.
Does a Higher Quality Setting Make GPT Image 2.5 Flare Slower?
A little, on average, but not predictably. One high run was left out of the timings because an unrelated task overlapped with it, so there are fewer timed runs than images:
Tier | Timed runs | Range | Median |
|---|---|---|---|
Low | 2 | 22–31 s | about 27 s |
Medium | 6 | 29–65 s | about 40 s |
High | 6 | 26–66 s | about 46 s |
Xhigh | 1 | 86 s | – |
Max | 1 | 55 s | – |
High’s median was a few seconds slower than medium’s, but the ranges overlap almost entirely: our fastest high run beat every medium run. Max even finished faster than xhigh. The overlapping ranges suggest that normal run-to-run variation may be as noticeable as the difference between medium and high. That’s consistent with our Flare vs Sunburst review, where Flare ranged from about 32 to 85 seconds at a single setting.
The takeaway: the tier affects your credits far more reliably than your wait. Don’t downgrade quality just to save time.
Credit Cost: What Each GPT Image 2.5 Flare Tier Really Costs
Here is what a 99-credit Starter pack buys at each GPT Image 2.5 Flare setting:
Setting | Credits per image | Images per 99 credits |
|---|---|---|
1K Medium | 1 | 99 |
1K High | 3 | 33 |
1K Xhigh | 5 | 19 |
1K Max | 9 | 11 |
4K High | 7 | 14 |
4K Max | 25 | 3 |
Low only saves credits at 2K and 4K. In our photo example, high to xhigh produced the largest visible change for two additional credits; treat this as one result, not a guaranteed jump for every prompt.
Pairing Quality With Resolution
Because GPT Image 2.5 Flare treats quality and resolution as separate controls, it’s worth choosing them together. These pairings are starting points based on the credit table, not test results at 2K or 4K:
1K Medium (1 credit): prompt drafts, composition checks and quick social images.
2K High (4 credits): blog headers, ads and landing-page images that need more pixels than 1K.
4K High (7 credits): large banners or images viewers will zoom into.
4K Xhigh (12 credits): a final product or hero image, once you’ve confirmed xhigh helps your subject at 1K.
4K Max (25 credits): a handful of approved final images where extra styling is welcome.
Test each GPT Image 2.5 Flare tier at 1K first, where it’s cheapest, then scale up the resolution only for the version you’ll publish.
A Credit-Saving Workflow for GPT Image 2.5 Flare
Start GPT Image 2.5 Flare at 1K medium and write down two or three requirements before you generate.
Review the result at its real display size.
If the composition or content is wrong, rewrite the prompt. Don’t raise the tier.
If the prompt is clear but detail is weak, compare high using the same prompt and size.
Use xhigh or max only when they fix something that matters in the final image.
Re-run only the winning prompt at your final resolution, such as 2K high for blog headers.
For edits, separate what changes from what stays:
Change only: Replace the background with a uniform pale-gray studio sweep.
Keep exactly: Product shape, label text, cap, colors, camera angle, framing, foreground shadows, and every object not named above.
When to Switch From GPT Image 2.5 Flare to Sunburst
Raising the GPT Image 2.5 Flare quality setting can improve detail, but it doesn’t turn Flare into Sunburst. OpenAI positions Sunburst for tighter control, especially in repeated edits where everything except one element must stay the same. Credit costs are nearly identical, so the choice depends on the kind of work:
Choose Flare when you generate, look, adjust and regenerate quickly.
Choose Sunburst when precision in edits matters more than turnaround.
See the GPT Image 2.5 Sunburst page for details.
Ready to find your own sweet spot?
FAQ
What quality settings does GPT Image 2.5 Flare support?
Flare supports low, medium, high, xhigh and max, and the API also accepts auto. On our generator you choose the tier under “More settings”, and the credit cost updates before you generate.
Does a higher quality setting increase image resolution?
No. Every tier returned the same pixel size in our tests. To get a larger image, switch to 2K or 4K.
Is low quality worth using?
Rarely at 1K, because it costs the same one credit as medium, and in our photo test low dropped a requested element that medium kept. At 2K and 4K, low saves one credit per image, which can add up across large draft batches.
Which Flare quality setting is best for text in images?
Short headlines and captions came out correct at every tier we tried. For text-only posters, medium is enough. For infographics with meaningful icons, compare medium and high: high produced more logical illustrations in our test.
Is GPT Image 2.5 Flare max quality worth 9 credits?
Only for final pieces where mood matters. In our single test, max added atmosphere over xhigh but also the most unrequested props, and surface detail was about the same. Compare it with xhigh on your own prompt first.
Do Flare and Sunburst use the same quality settings?
Yes. GPT Image 2.5 Flare and Sunburst offer the same five tiers. At the time of testing, both models used the same credit costs except at 2K, where low and medium cost one additional credit on Sunburst. The difference between the models is speed versus editing control, not the quality menu.
Why did Flare ignore part of my editing prompt?
Look for competing instructions. Our prompt asked for a plain backdrop while also keeping the original lighting, and all four outputs kept a window-shaped shadow. Spell out exactly what to remove before you raise the quality.
Do I need an OpenAI API key?
No. Our browser generator runs GPT Image 2.5 Flare without your own API key; you only need an account. The site is independent and not operated by OpenAI.
Can I use GPT Image 2.5 Flare for free?
Yes. At the time of testing, new accounts got 10 free credits on signup, enough for ten 1K medium images. Check the current offer before you sign up.
Final Verdict
It is easy to overspend on GPT Image 2.5 Flare quality settings, or to use too low a setting for the image that matters most. Our tests point to a simple rule:
Draft on medium. It costs one credit at 1K and provided a strong baseline across our tests.
Publish on medium for most social posts, blog images and thumbnails. Compare high when illustration logic or material detail still falls short.
Compare high and xhigh when material texture matters; xhigh produced the strongest texture in our single photo example.
Test max sparingly when atmosphere matters, and watch for unrequested additions.
Rewrite, don’t upgrade, when two tiers make the same mistake.
Quality does not change the pixel dimensions, but it can affect detail, composition and other rendering choices. Keep quality and resolution separate, and you will spend credits more deliberately.